Poultry vet, David Parsons, explores the use of infra-red imaging to monitor poultry and eggs…
Work took me to Devon’s south coast which at the end of a long day, was a very pleasant treat. No sandy beach here, more pebbles, large or small, flat or rounded and in a multitude of pastel colours. None of this bright, clashing and garish colour that the modern human seems to adore.
Perhaps just as well that our limited vision does not allow us to see in either the ultraviolet or infra-red parts of the spectrum. The fact that we know they are there and can visualise them with appropriate equipment is sufficient.
I used to use an ultraviolet light to candle eggs when I had more commercial hatchery work. Obviously, I was careful not to look at the light, nor keep it on any individual egg for too long because of the heat. Selection of infertile eggs and early dead embryos for further examination was easily accomplished. The equipment, which was old when I got it, is still in my loft. Perhaps more suited to an antiques fair, having recently discovered that antiques now include items from my early and late childhood.
However, it is what can be learned by looking at the infra-red spectrum that I want to explore. I have no doubt that through films, police camera footage and news items that you are familiar with the concept of looking for bodies in the dark, in wooded and disaster areas because they show up because they radiate more heat than their surroundings. You will also be only too aware that with the more severe illnesses we develop a temperature or fever, which I was hoping to be able to detect.
My thought when purchasing an infra-red camera was that it might help me pick out any birds that were sick because they had an elevated temperature. I have not been able to make that work on a flock basis. On an individual basis it works well, not least with Milly, my cat, who was obviously lame but would not allow a close examination of the troublesome paw.
As with any new piece of technology you need to understand its limitations. Yes, the camera will record temperatures and plot the difference between two objects but what is the significance of those readings? I needed to establish which settings were most appropriate on the camera and what readings are obtained when examining healthy individuals in a consistent way. On my camera there are two settings that I can alter. The first is the ambient air temperature and the second is the distance of the camera from the object or hen that I am monitoring. Once these are fixed, I can then alter the colour of the displayed picture which has a more psychological impact than real.
EXAMINING SMALL FLOCKS
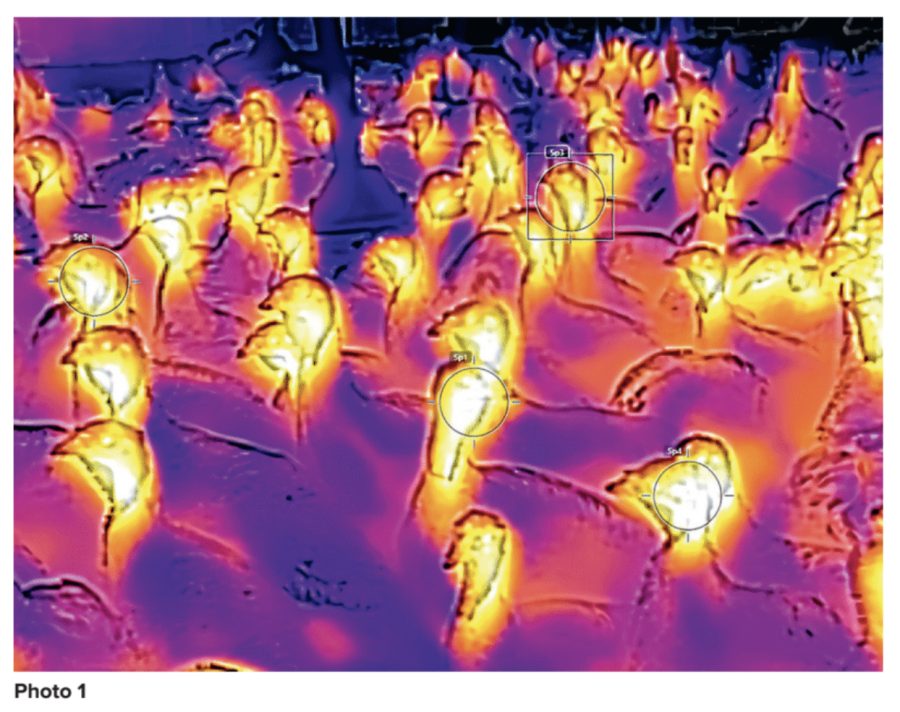
My initial examination of small flocks of poultry were disappointing. I was unable to spot any potentially sick birds. Picture 1 is of a flock of turkeys. I think the shape of the head is a good giveaway. Being unfeathered is also useful for our purposes. You may be able to make out some circles labelled sp1 to sp4 which are over the head of 4 turkeys. The head has a white to yellow colour. The white colour is equivalent to a maximum temperature of 38.9ºC. The head temperature for the three turkeys nearest to me are 38.3ºC, 38.6ºC and 38.8 ºC whilst the fourth turkey that is furthest away is recorded at 34.1ºC. The temperature of the purple colour over the shoulders is 22.8ºC. A naked head and neck is the normal state for turkeys. This picture shows how much heat is lost from unfeathered areas of the head and neck and just how important feathers are in maintaining body temperature because of their excellent insulation properties. However, in terms of spotting potentially sick birds the infra-red camera has not added anything that I could not have suspected from simple observation.
HATCHING EGGS UNDER THE LIGHT
Consequently, I turned my attention to hatching eggs because the farms that I was visiting have parent flocks that lay hatching eggs that produce chicks for free range egg farmers. These results were much more interesting both from an individual hatching egg and egg storage point of view. To get the best from pictures taken using infra-red you really need the computer programme.
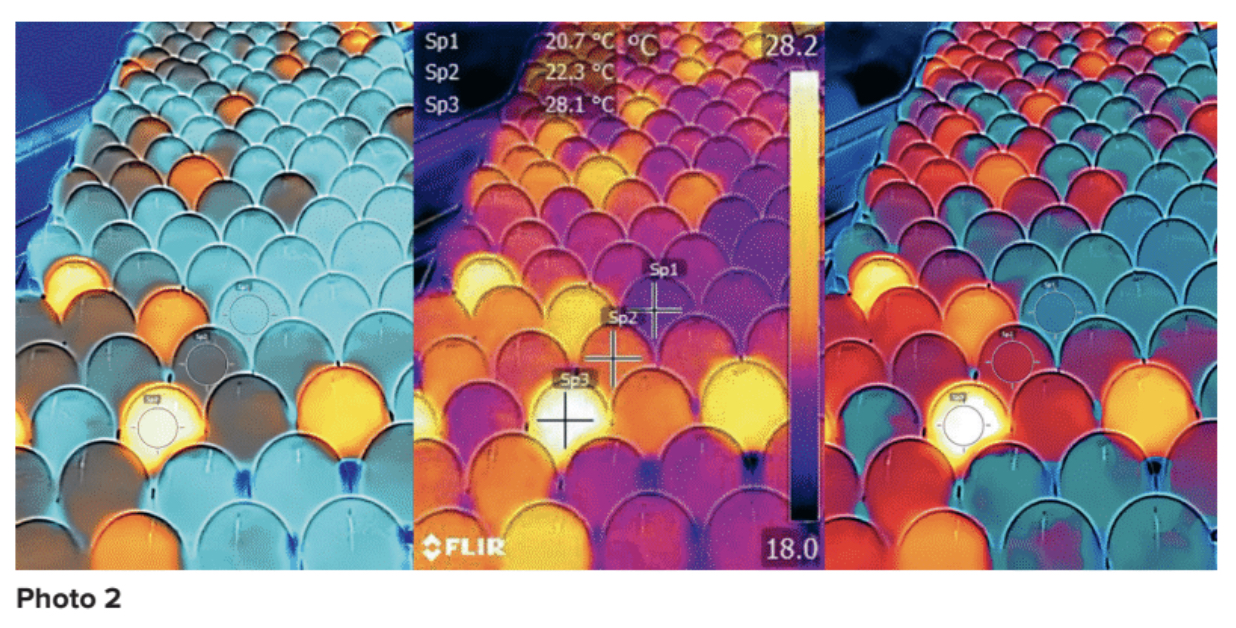
You can manipulate the pictures in many ways as I have shown in picture 2. You are looking at a plastic tray upon which are hatching eggs that have just been collected from the laying house. All three pictures are of the same eggs. It is important not to just rely on your feeling of what the egg temperature might be simply on the basis of colour. The left hand picture might make you think that there is a big difference between the coldest and the warmest. The right hand picture gives the feeling that there is a bigger mix of cold and warm eggs whilst the one in the middle is intermediate between the two.
The actual temperatures of the purple, orange and white egg in the middle picture are 20.7ºC, 22.3ºC and 28.1ºC. All three eggs are still quite warm. You can detect these differences in egg temperature simply by handling the egg or using an ear thermometer as I describe later. This picture reminds us that when an. egg is laid it will be warm, at the hen’s body temperature, around 41ºC, and damp. As it cools, moisture will be drawn in through the pores in the eggshell along with any bacteria that are present.The egg dries rapidly, in a few minutes, but it takes longer to cool down below 20ºC. Until this happens the cells that. will eventually become the chick are still developing. It is important that these cells go into stasis before incubation starts, otherwise it is likely that embryo will not develop into a chick.If you are not using a broody hen, thenit is very important that you keep hatching eggs clean, cool 16 – 18ºC and at around70% humidity to prevent water loss from the egg.
IMPORTANCE OF ROOM TEMPERATURE FOR INCUBATION
In the commercial setting I have yet to spend time monitoring eggs to see how quickly the eggshell temperature drops.You can check easily if you have an infra-red ear thermometer and a maximum and minimum thermometer in the room where you keep you hatching eggs. Using the ear thermometer place the plastic cover over the end that both protects the sensor and keeps the thermometer clean. Then gently rest the thermometer on the eggshell and record the temperature. Ideally it should be less than 20ºC and no lower than 12ºC.The room temperature should be around 14 to 18ºC. It needs to be at this constantly and not fluctuate wildly either way, getting very hot or very cold. Both situations will result in death of the embryo which will show as poor hatchability.
How you treat the hatching egg prior to incubation is critical to good hatchability. Nest boxes must be clean to prevent bacterial contamination of the egg. You must collect eggs as soon as possible after they have been laid. You do not want them overheating in the sun or freezing with a sudden cold snap. Make sure you only use and store clean hatching eggs which are kept in a room where temperatures are cool and do not fluctuate greatly. Finally, when you have all that correct, I hope that you hatch more hens than cockerels.
To receive regular copies of The Country Smallholder magazine featuring more articles like this, subscribe here.
For FREE updates from the world of smallholding, sign up for The Country Smallholder newsletter here.