Meriel Younger from www.electricfencing.co.uk answers the most common question asked when setting up an electric poultry netting system.
Question: “I’ve put my netting up and I’ve checked it again and again and I cannot find out why there is no power going around my netting. My energiser is working fine but I’ve tested my fence… no pulse. What do I do next?”
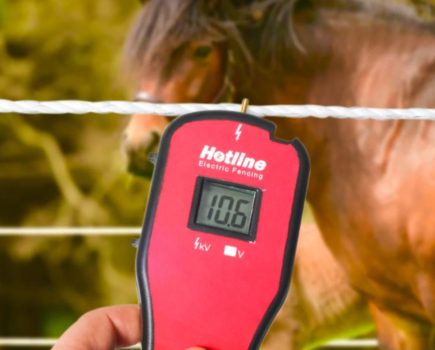
Answer: In general, if the energiser is working OK (it has been tested whilst disconnected from the fencing) and there is no power in the netting, there is a short somewhere which is draining the power out of the netting or the fence is not earthed properly. So check the following:
a. Check for sagging – the netting is sagging perhaps due to undulating ground or the netting has not been tensioned properly. The bottom horizontal line is not electrified but the next line up is. So is this electrified line touching the ground, foliage, grass or has got the electrified line got caught under the metal prong of a post? If it is the power will be draining into the ground. Test your earth stake with your tester to see if there is a reading.
b. Check your earth stake. Earthing as you probably already know is an essential part of an electric fence. Make sure your earth stake is pushed as far as you can get it into the earth. If you have a 1m earth stake please ensure at least 3/4 of it is in the earth. The earth stake needs to be away from foundations and tree routes. The earth stake – particularly with mains systems – doesn’t need to be right next to your fence. If the ground is very dry in the summer time water around the earth stake … your fence will work more efficiently.
How to improve your set-up
a. If you are moving your poultry net on a regular basis please check it as meticulously as you did the first time you put it up … check for shorts and for any of the snags mentioned above. If the ground is undulating or the area you are setting your fence up in is particularly exposed then it is advisable to use extra posts – either more of the posts that are already contained within the netting or the extra strong corner posts. The heavier duty corner posts are excellent for this – they are slightly taller and a lot stronger than the other posts in the netting. These corner posts… as in their name .. are great to be used in the corners along with guy ropes. Posts can be added in at any point in your netting – just weave through the netting, secure with the b-clip at the bottom and tension over the top cap.
b. Get good tension into your net by using guy ropes that are supplied with your kit (white rope in the repair kit) These can be cut in half and tied half way down the post and secured the other end by the yellow plastic peg. You can get really good tension into your fence if these ropes are used correctly… don’t put them at the top of the post as the post would then bend too much.
c. When you are putting up your netting initially lay it out first in the rough shape you want to create then go around the net putting the posts in as you go. Use your foot to guide the posts into the ground – pull the netting as taught as you can and push the post into the ground. Then onto the next post etc
d. If you still cannot get the sagging out of the netting there is an option to cut the first live horizontal line at both ends of the net – this stops the power going through that line. Or you could put dpc plastic under the fencing – see photo.
——————————
GET ADVICE HERE:
info@electricfencing.co.uk
01620 860058
Image(s) provided by:
Archant