As some of us prepare to incubate eggs in the new year, Fiona and Hugh Osborne relate a cautionary tale about the array of cheap incubators on the market…
We breed Buff Orpington chickens and we make extensive use of an array of quality incubators from the British brand, Brinsea. We cannot tell you how many times we have been asked on social media why we don’t save our money and buy a cheap incubator that “has all of the same functionality” from eBay or Amazon. There’s a simple answer…
We did. It didn’t go well. We learned from our mistake.
When we first started out breeding chickens, money was tight, but we needed an incubator to support our broody hens. Some broody hens break their brood part way through incubations, while others don’t always understand that they are supposed to sit on all the eggs for 21 days. What’s more common is that a broody hen will abandon the nest before hatching is complete so having an incubator on hand makes sense.
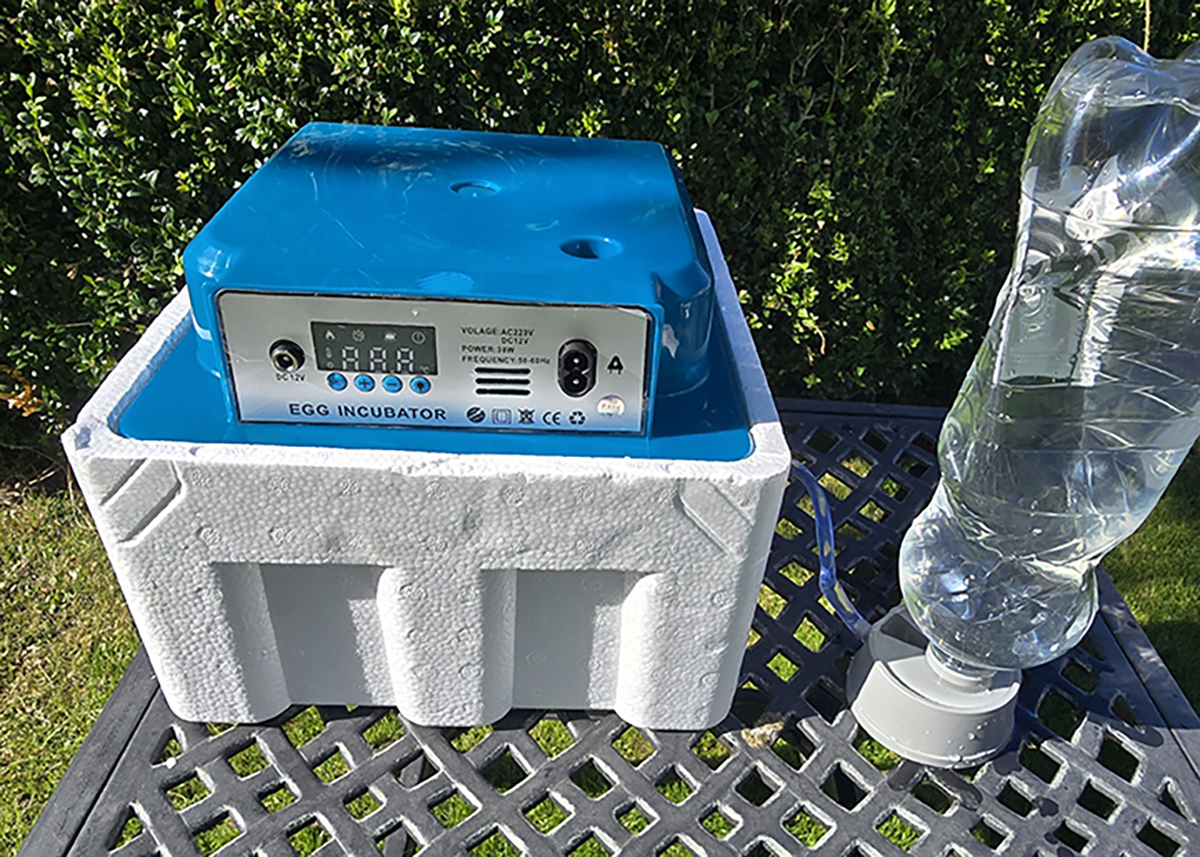
We bought a cheap incubator from Amazon that appeared to be fully automatic
We carried out extensive research and found that Brinsea incubators were recommended by a vast array of trusted breeders and poultry press, but we also saw the price of incubators from China on eBay and Amazon. We just kept coming back to these cheaper units that advertised fully automatic functionality for ridiculously cheap prices and we fell for the sales patter. We bought a 21-egg incubator from eBay and soon realised that it was a false economy.
To be fair, we didn’t know any better at the time so when we had our first hatch and the hatch rate was (very) low, we blamed the eggs but when subsequent hatch rates got progressively worse, we realised our mistake. In the end, we threw the incubator away and bought a Brinsea Ovation 28 Advance incubator and instantly, our hatch rates went up. It was no coincidence.
TIME HAS MOVED ON
Due to this poor experience with the eBay incubator, we believe the mantra for incubators is “buy up to a quality, not down to price”. To be fair, the cheap incubator that led us to believe this was purchased over a decade ago. When we decided to write this article, we realised that it would not be fair if we wrote only about an incubator that we had disposed of years ago and not one that was available now. As a result, we decided to purchase another cheap incubator to see what has changed.
In looking for the incubator, we set some criteria:
- Automatic turning
- Automatic temperature control
- Automatic humidity control
- Holds at least 12 eggs
- Costs less than £50
- At least one 5-star review
We found an incubator on Amazon that fitted the bill. It held 16 eggs and appeared to have everything on the list and even had a candler on the top to help us monitor the development of the chicks inside the egg. Unfortunately, when we received it and inspected it, we were incredibly disappointed to find that the incubator build quality hadn’t improved in recent years. If this incubator was anything to go by, quality had actually deteriorated. It was wholly unsuitable for successful hatching.
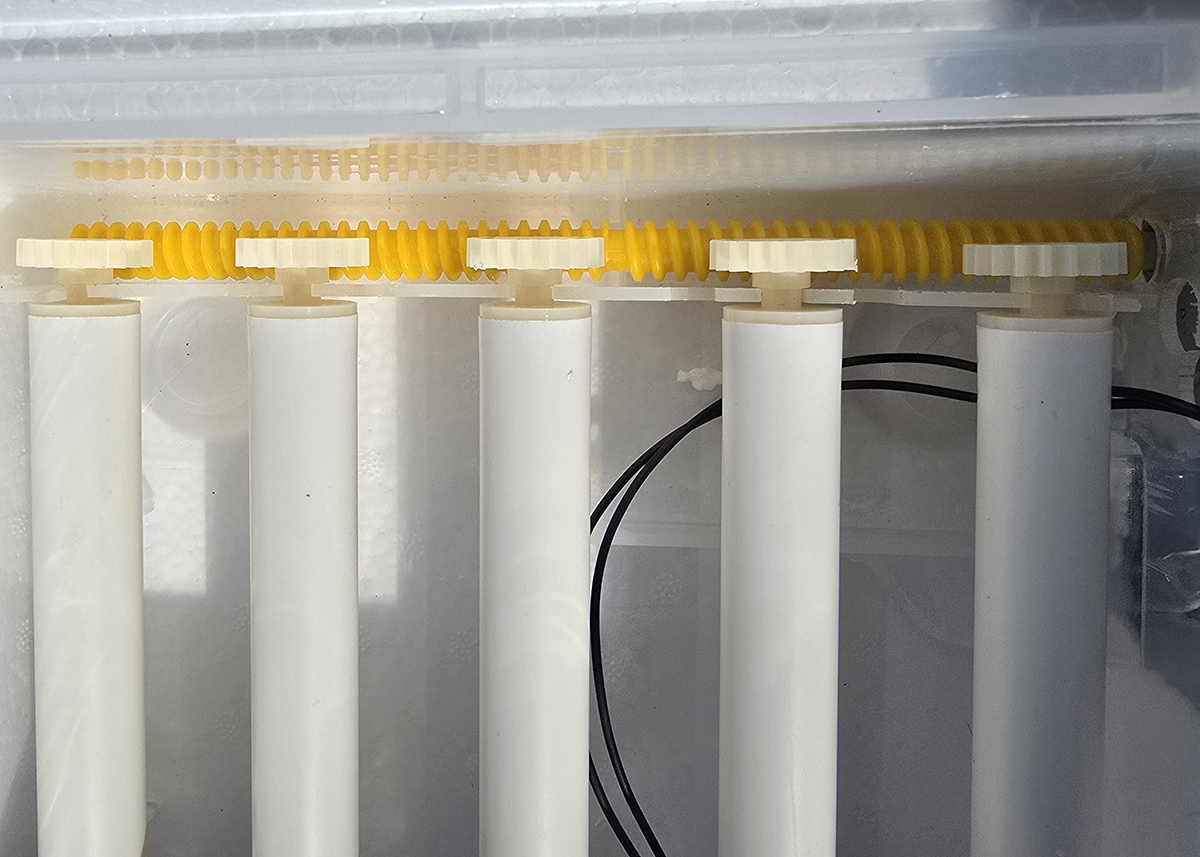
Automatic turning is achieved by a series of rollers with gears that fit into a worm screw
AUTOMATIC TURNING
Turning the eggs during the incubation process is very important as without it, the developing chicks could stick to the membrane on the inside of the egg. It would be impossible for a chick to successfully hatch if this happens as they do need to be able to turn around inside of the egg to hatch.
Automatic turning in the cheap incubator was achieved through rollers that support the eggs gradually turning. The way the rollers are moved is by gears at the end of the rollers fitting into a long worm screw that, in turn, is moved by the incubator motor. The problem with it is that not all of the gears have been cut precisely or properly. We found that if there were defects on the gear, they popped out of the screw, preventing eggs from turning.
TEMPERATURE CONTROL
This was interesting as the advertised product showed pictures of an incubator with a clear plastic base. When it arrived, it did have a single layer, clear plastic
base, however on delivery, we found it was encased in an opaque polystyrene outer. The instructions advise that the polystyrene outer should not be removed in cold environments as it contributes to temperature control, but if you don’t remove it, it prevents you from seeing what is happening inside the incubator. If the gear pops out of the turning screw, we couldn’t see it. If hatching was happening, you couldn’t see it.
The simple solution is to remove the polystyrene, but then the problem would be that the incubator would have to be kept in a room where the temperature did not fluctuate much.
With only a single layer of plastic, heat loss is a problem. To be fair, if your home is maintained at a consistent temperature, it shouldn’t be a problem. Our issues are that as our home is primarily heated with wood, we don’t achieve a consistent temperature in the house 24 hours a day.
HUMIDITY CONTROL
Our criteria for humidity control in the incubator was that it should be automatic. We should have read the sales description on the item better, because it actually said, ‘Automatic Water Filling’ and not ‘Automatic Humidity Control’. We thought that this was probably a translation issue as most of the sales description was in broken English. Unfortunately, what it said wasn’t a translation issue. It was true.
In a quality incubator, humidity can be controlled by a capstan pump pulling water through a pipe from a water reservoir. The alternative is that you can manually add water to an internal water reservoir to keep humidity at the required levels.
Both methods allow you to alter humidity levels as required. We generally run the incubators at around 45% humidity from days 1-18 and then 70% from day 19 in readiness for hatching. The higher humidity makes it more likely that the chicken can be mobile in the egg allowing it to turn around more easily and nibble the eggshell to free itself.
The cheap incubator has something in between which doesn’t deliver the humidity control of either option available in a quality unit. The incubator comes with a pipe and pod that connects to the incubator. You then fill a 1litre pop bottle with water and turn it upside down, fitting it into the pod. Good luck with managing this without spilling water everywhere. We certainly couldn’t. Once fitted, there is no way of regulating the flow of water into the incubator. It is simply fed by gravity so the humidity cannot be adjusted upward for that crucial hatching period.
HATCHING
We are adamant that we will not use this incubator for hatching as we are concerned about a number of aspects of safety for the chicks. To put this in context, when a chick has fought its way out of an egg, it’s using its legs for the very first time. As a result, their first movements are very clumsy and almost completely uncoordinated.
The first issue for the incubator relates to the plastic hatching mat insert that the chicks will walk on once they free themselves from the egg. There are two problems. The first is that the lattice pattern in the plastic, designed for the chicks to grip, are far too large for chick feet. That means there is a danger that they could get a foot caught.
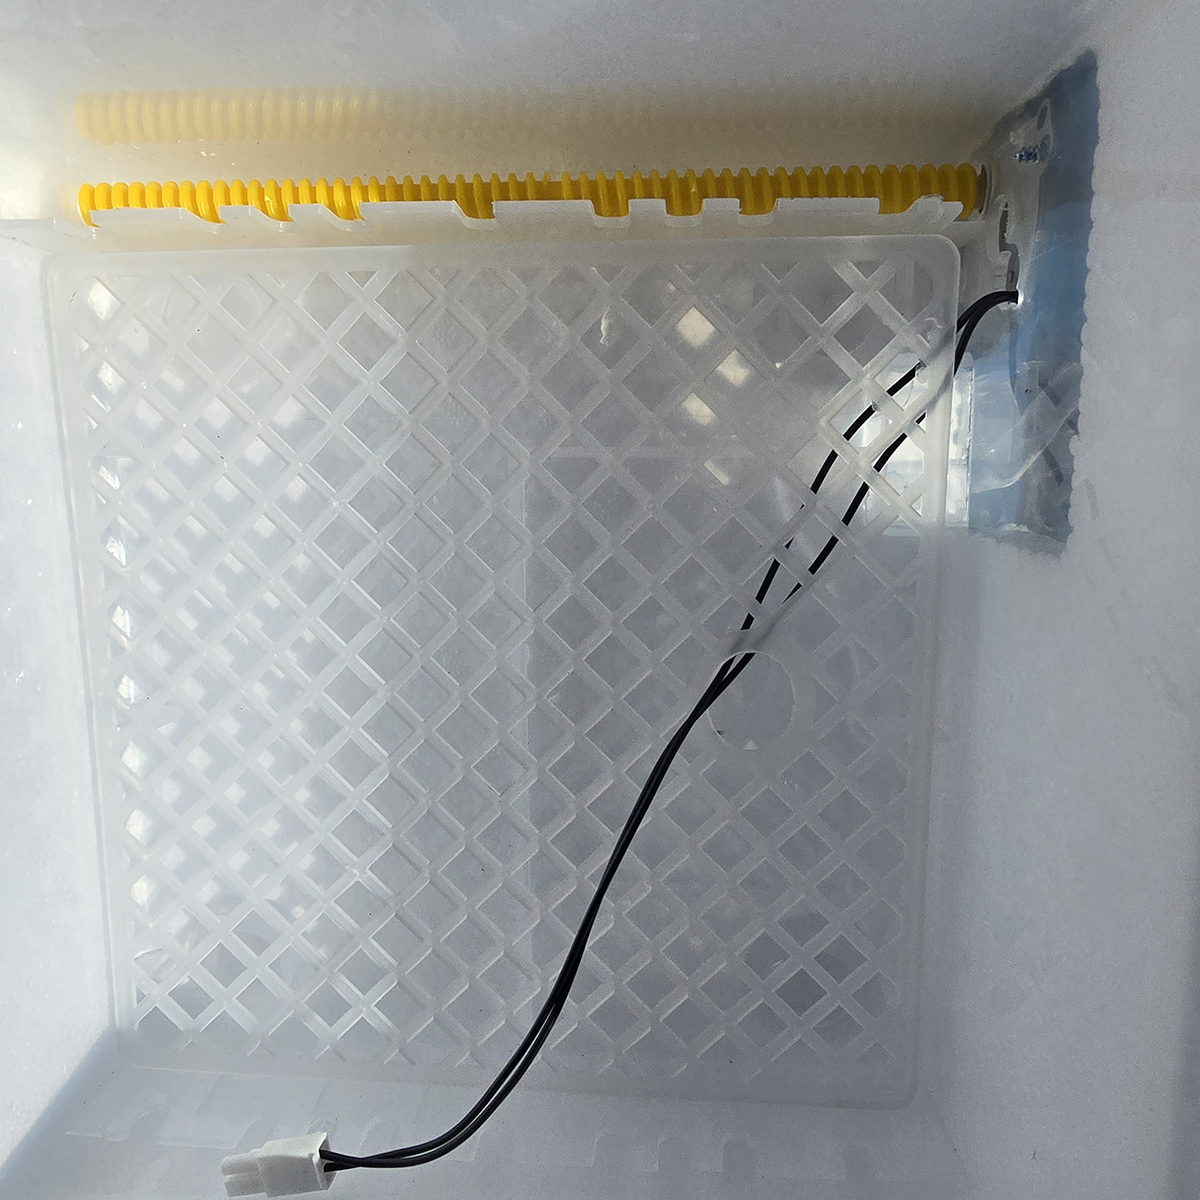
The supplied plastic hatching mat didn’t cover the work screw through which could be a hazard to hatched chicks
The second problem is that the hatching mat does not cover the entire footprint of the incubator. It fails to cover the trough at the side where the auto-turning worm screw sits, so this screw is exposed. An uncoordinated chick that has just come out of the egg could very easily fall into the trough where the screw sits. Best case scenario, the chick gets stuck, worse case scenario, if the screw hasn’t been disconnected for hatching (a very easy thing to forget), the chick could be significantly hurt.
CLEANING
After every hatch, it’s a necessity to clean an incubator. There’s lot of biological matter left behind. The egg membrane, with remnants of blood vessels in the base of the incubator, would be fairly easy to clean with a suitable disinfectant. Unfortunately cleaning the fan and the heater section would be an impossibility. It’s easy to overlook this area in cleaning, but chicks do give off small parts of their down feathers during hatching and “fluffing up”. These small bits of fluff quickly build up on the motor and fan, which if not removed, will encourage bacterial growth as they are biological elements. Quality brands like Brinsea publish videos on how to clean their incubators, taking you step by step through the process as they understand the importance of cleaning.
What we found with this new cheap incubator is that the screws that hold the housing over the fan in the incubator cannot be removed. The screwheads had been damaged by over tightening. As a result, it’s impossible to get to the fan to prevent the build up of biological matter. That means that after being stored, next time we tried to use the incubator, it would be spreading, at best, rotting biological matter, and at worst, bacteria that had grown on the rotting biological matter during storage.
WAS THERE ANYTHING GOOD?
You’re probably reading this article thinking “So was there ANYTHING good about the cheap incubator?”. Yes, there was, the candler worked well. It illuminated the inside of the eggs very well, but it would make an expensive and bulky candler.
IN CONCLUSION
We’ll make this short and sweet. Don’t waste your money buying a cheap incubator from EBay or Amazon. Buy once. Buyquality and reliability like a Brinsea.
Want to know more about Hugh and Fiona? Visit www.youtube.com/@EnglishcountryLife or visit the Poultry Equipment Shop at www.englishcountrylife.com
This article was taken from the December 2024 edition of The Country Smallholder. Buy the full issue here.

