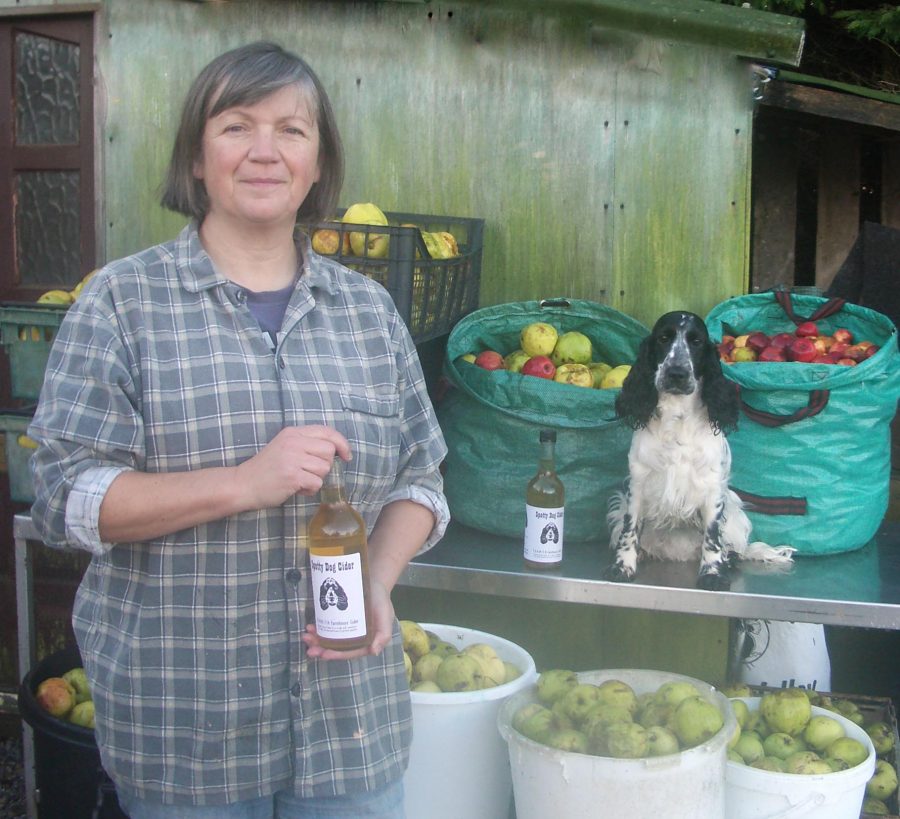
Lorraine Turnbull, an experienced award-winning smallholder and author describes how to press your apples and make delicious juice and cider.
One of the joys of the harvest from the orchard isn’t biting into a fresh apple – here in the UK we can do this at any time from the end of August through until mid-December, but when we have an abundance of apples of every variety and type means juicing time and the start of cider making. I’m sharing the secrets and an easy-to-follow guide to making your own apple juice or cider in this article.
THE FRUIT
Cider can be made from almost any type of apple. However, you will get a more complex flavour if you use a mix of apple types– dessert, cookers and cider apples. Apples can be divided into groups according to tastes –sweets, sharp, bittersweets and bittersharp. The last two are found in cider apples because of the high concentration of tannin. If you don’t have access to cider apples, try adding some crab apples to supply the tannins, and some Russets to give a bit more body. You can even stew a couple of tea bags in a litre of hot water and add this to increase the tannin levels.
Apples are ripe when the pips are brown, the skin ‘gives’ slightly when pressed with a thumb and the skin has a waxy appearance (obviously not for russets).
You need ripe apples to get the high sugar levels necessary for fermentation, and can ripen apples by storing for a few days. Don’t use mouldy fruit for juice or cider. For juicing apples must be free from any cuts/damage/mould. Basically if you wouldn’t take a bite out of it – chuck it away.

MILLING AND PRESSING
If you want to make over 100 litres I’d suggest hiring a Speidel mill or fruit shark, but small quantities of apples can be processed with a food processor in the kitchen. Whatever you use, thorough cleaning afterwards is essential to prevent the acid eating into the metal blades. The resulting pulp will soon discolour. When making juice (not cider) you can add Ascorbic acid powder (Vitamin C) at 5g per 10L of juice whilst pulping and mix it in to prevent juice going brown.
Don’t add this if you are making cider as it will prevent the fermentation.We use a rack and cloth press, but you could use a small barrel press. See my article on building a wooden rack and cloth press. The juice is collected in food safe containers and transferred to fermentation vessels; these could be demijohns or large plastic barrels with an opening to fit a bung and airlock. The amount of juice depends on the variety of apples; russets for example always give less juice than dessert apples, but you can look at 25kg producing around 16-18 litres of juice.If you are making juice only jump the next stage and go to pasteurisation and storage.
DEALING WITH THE JUICE
We take the traditional routein cider making. We don’t add sugar to bump up the alcohol, but we don’t just let the juice sit with no help. So initially, we let the juice sit overnight and this allows a small amount of wild yeast to begin working. At this stage I take a pH reading to establish how acid the juice is.
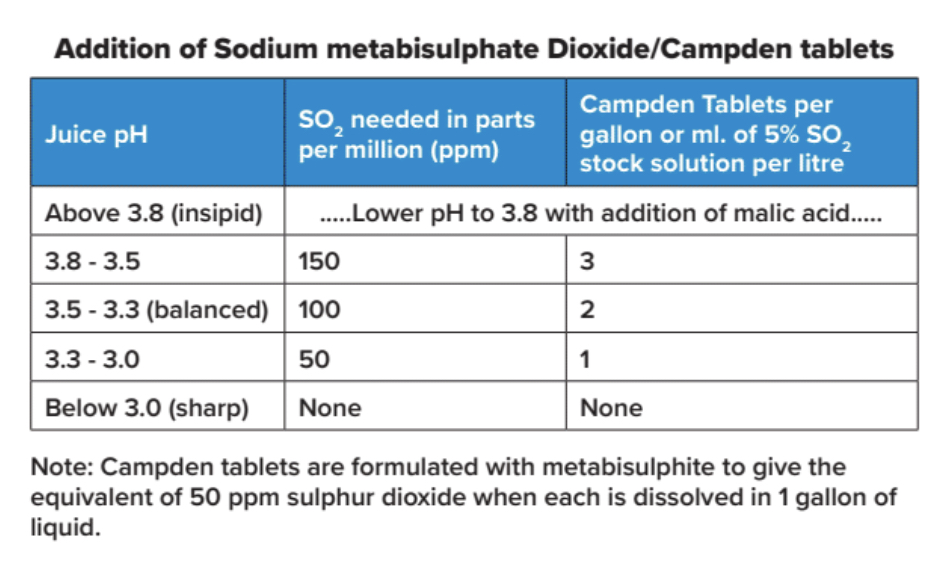
Narrow range ‘pH papers’(e.g. pH 2.8 to 4.2) are now available cheaply from some home brewing suppliers. A desirable juice pH range for cider-making is say 3.2 – 3.8. I record this on a batch sheet; you could just note it in your diary. The next day we add sodium metabisulpite (you can use Campden tablets). The formula we use is 10g to 100ml of water to make a 5% solution. Then add 1ml of this per litre of juice. Mix in well.
[*] Sulphur Dioxide/sodium metabisulphite
The Camden tablets/Sodium metabisulphite inhibits the growth of most spoilage yeasts and bacteria, and we add it one whole day prior to adding our chosen yeast. Only small amounts of sulphite are used, and its effectiveness depends on the pH of the juice. The table below shows the appropriate levels to use before yeast is added for the fermentation. Lower levels are needed if a ‘wild’ fermentation is required, or there is a danger that all the wild yeast will be killed. In the absence of sulphur dioxide, the fermentation is much less likely to be ‘clean’ although with care it is possible to do without it. I would always advise the beginner to use Campden Tablets to minimise the risk of taints and infection. Later on, the experienced cider maker can omit it at his discretion and see what difference it makes.

[*] Preparing to ferment
You can add sugar or wateretc at this stage if you wish,although we don’t (manycommercial ciders are now made from around 35% juice and 65% glucose syrup and water). Excessive dilution (over 15%) will make the cider ‘thinner’ in its overall complexity of flavour. I also take an initial SG reading now to check how much sugar is in the juice, using the hydrometer. In a good summer, sugar levels in apples might be as high as 17%, but in a cool wet summer, less than 10%.
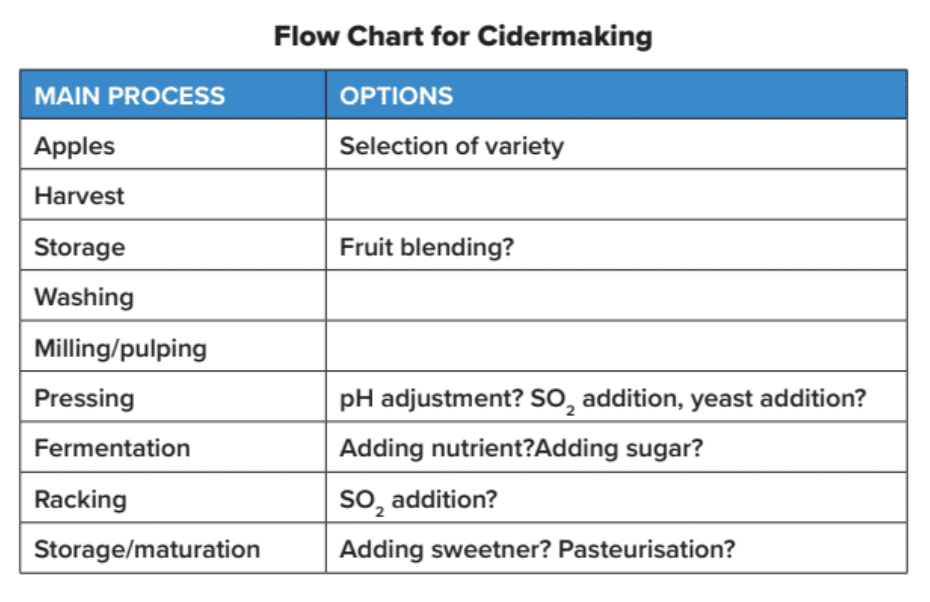
For cider-making, measure the juice ‘specific gravity’ (S.G.) after pressing, using a hydrometer (around £8). Roughly speaking, 15% sugar corresponds to an SG of 1.070 and a total potential alcohol of 8.5 %; 10% sugar is SG 1.045 and a potential alcohol of 6%. If the juice S.G. is less than 1.045 and you have no sweeter juice for blending, it should be brought up to this level by the addition of sugar. Otherwise the resultant alcohol level may not be sufficient to protect the final cider during storage.To raise the S.G. in 5° steps ,dissolve 12 – 15 grams of sugar in each litre of juice and re-test with the hydrometer until the desired level is reached. The juice should now be housed in a suitable clean vessel for fermentation. The next addition is that of yeast nutrient, which is needed by the yeast for its own growth. Apple juices are generally very low in yeast nutrients so your fermentation rate will probably be much improved if you add these. The fermentation is also much less likely to ‘stick’ or to grind to a halt before completion. The cider can therefore be racked and bottled sooner, reducing the chances of spoilage in store.
[*}The Yeast
Stick to a good general purposewine or cider yeast – not a brewer’s or baker’s yeast. Follow the yeast supplier’s directions. If sulphur dioxide is used, it is also important to wait overnight before adding the yeast culture. Fermentation should commence within 48 hours after you sprinkle the yeast directly on top of the juice and gently give it a stir. You can perhaps skip the nutrients unless the fermentation begins to ‘stick’ or if you know that your fruit comes from old trees with very low nutrient levels and you are not prepared to wait a few months.
TOP TIP: When you open the cider, if you feel there is something not quite right, it smells unpleasant or has mould, do not drink and review carefully your steps in making it to find out what went wrong. It’s always a good idea to mark on a calendar what you did and when.
CONDUCT OF THE FERMENTATION
You must also have some sort of ‘airlock’, fitted shortly afterward fermentation starts, to allow carbon dioxide gas to escape but to prevent air getting in. If using a demijohn fill to the shoulders only, if a barrel leave a few inches headroom, and plug with a loose wad of cotton wool to allow the initial excited fermentation to settle. After a day or two, you should see considerable frothing and production of carbon dioxide (bubbles in the airlock). When the initial frothing subsides, top up with juice and fit an airlock to ensure that the flow of gas remains one-way. As the juice ferments with time (could be a few weeks or a few months) you will see a reduction in the speed of air bubbles through the airlock and you should consider the first racking of the cider from its yeast at an S.G.
1.005. If it stops fermenting at an S.G. much higher than this, then it may be ‘stuck’, and nutrient addition together with twenty minutes vigorous aeration may help the yeast to grow again. It may also stop if the temperature falls too low, but when the weather warms up again, the fermentation should re-commence.The first racking should be into another clean vessel, trying to leave behind as much yeast as possible and with the minimum of aeration to the cider. This is generally done with a clean plastic syphon tube fixed to a plastic rod so it rests just above the yeast deposit or, on a larger scale, with a suitable pump. The transferred cider should be run gently into the bottom of the new vessel without splashing. Now it is important to minimise the headspace and to prevent air contact as much as possible. This is why some people add 50 ppm of sulphur dioxide at every racking, although at the first racking this is probably unnecessary because of the remaining carbon dioxide.
MATURATION AND BOTTLING
After the first racking the air-lock is re-fitted until it is clear that gas production has ceased, when the vessel should be topped up with water or cider and tightly closed. A second crop of yeast may be thrown as the cider settles down. The cider may remain in this state for several weeks, before a final racking to a closed container for bulk storage or directly into bottle. Don’t let it sit on the lees for more than 2 weeks. Occasionally, if the ferment goes on into the spring (if you’ve pressed apples later than October), you may get a secondary fermentation. It may be recognised by a small amount of gas bubbles in the airlock.
PASTEURISATION AND STORAGE
Cider bottled at this stage without pasteurisation will continue to ferment a touch in the bottle, and on opening you may notice a tiny ‘pop’ and a gentle fizzing on the tongue. This is bottle conditioned cider. If you wish to pasteurise your glass bottled cider, or pasteurise your juice (to prevent it starting to ferment) then bottle and cap and immediately pasteurise in a pasteuriser for 20 minutes at 68ºC. The heat will kill off any yeast and bacteria in the bottle. Carefully, place bottles on to their side on top of a towel (using gloves) to pasteurise in the neck and cap of the bottle.
A finished cider will benefit from maturing for at least 3 months as its flavour balance stabilises and the harsher notes are smoothed out by slow chemical and biochemical reactions, so juice pressed in September will be ready to drink at the earliest at New Year. Juice, once pasteurised will last up to 18 months, but unpasteurised will keep in a fridge for 3 days. Correctly pasteurised cider will last for up to 2 years.

This article originally appeared in the September 2023 edition of The Country Smallholder. Buy the issue here.
To receive regular copies of The Country Smallholder magazine featuring more articles like this, subscribe here.
For FREE updates from the world of smallholding, sign up for The Country Smallholder newsletter here.


