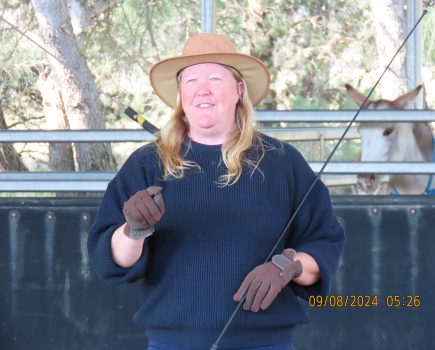
Chris Graham spent an enjoyable afternoon brushing up on his butchery skills with master butcher Mike Alexander…
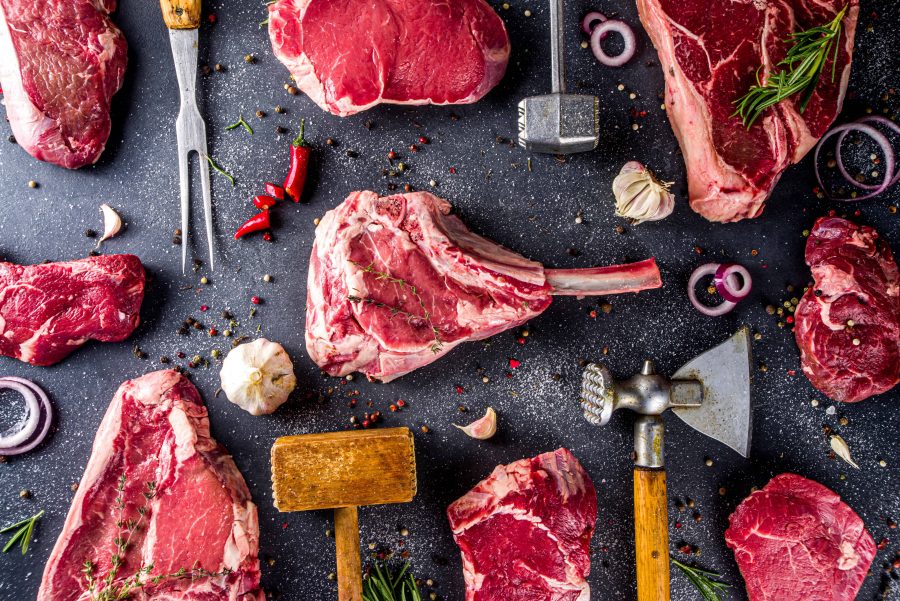
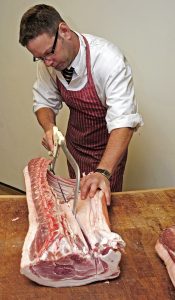
Great care is needed when jointing pork. Mike makes everything look deceptively easy, thanks to his years of experience, but beginners must always err on the side of caution when tackling this sort of work for the first time.
There’s always something fascinating about watching an expert at work! Mike Alexander presents just such a talent at his New Forest-based business, The Farmers Butcher.
Apart from preparing and selling pork chops, steaks, joints and sausages in his shop, Mike also runs three-hour Butchery Masterclass courses for budding butchers at all skill levels. He demonstrates the butcher’s art to up to four people at a time, and the subjects covered can be tailored to suit specific interests, with applicants being able to choose to include essentials such as knife skills, boning-out, rolling and tying plus, of course, sausage-making.
 Practical Experience
So when I got the chance to sample a course, I jumped at it. But I was wary of the breadth of the subject, so decided that my needs would be best served by a general introduction to the dos and don’ts of dealing with a side of pork. After all, not everyone opts to have their meat jointed at the abattoir, or by their local butcher. Judging by the growing popularity of Mike’s courses, an increasing number of people are choosing to have a go themselves, at home.
But the prospect of tackling a side or two of pork from scratch can be a daunting one, which is where Mike comes in. His first point to me emphasised the importance of having a plan. Just about the worst thing you can do is attack a side of pork without a clear idea of your objectives. It’s vital to have in mind which joints you want to prepare for roasting, whether or not you want chops, steaks or bacon, plus how much meat (and which cuts) you need to set aside for making sausages. Those tackling this for the first time will need to take advice on this from their butcher, or other pig keepers with more experience.
Next Mike ran through the basic equipment needed to tackle this sort of cutting job, then explained that, as a sensible first move, a side of pork – minus the head – can be divided into four main cuts; the shoulder, the loin, the belly and the leg. His demonstration made even this look deceptively easy! There are, of course, loads of things you can go on to do with each of these four pieces, but we were just covering the basics.
 Chilly Chopping
Carcasses that come back from the abattoir will have been hung and chilled, and it’s always good to start cutting when they’re in this condition; the meat is firmer to the touch and generally easier to deal with. However, when it comes to boning-out, if the meat is closer to room temperature, this will enhance its flexibility, making these operations less of a struggle.
In Mike’s opinion, the shoulder is the best joint on a pig, so he separated this first. Lots of people imagine the leg is the prime roasting joint, but the lack of fat here means that the end result can be dry and tasteless if you’re not careful with the cooking. Legs need to be roasted quickly; Mike advises 20 minutes per pound, plus a further 20 at the end. Then the joint should be allowed to rest for a further 20 minutes before carving.
By contrast, the shoulder offers a far better marbling of fat through the meat, which will keep the joint moist during cooking, and impart maximum flavour. It’s a versatile join too, and can be roasted conventionally, or cooked very slowly. With the hand and spring removed, but the blade bone left in place, a cool oven will cook this joint to perfection over 12 hours. The meat will literally fall off the bone, and the whole thing should feed about 10 diners.
Mike explained that the shoulder is also ideal for making sausages, because it contains just about the ideal proportion of fat needed to keep them moist and tasty. If you want to use the leg, you’ll have to combine it with the fattier belly cut too, otherwise the resultant bangers will be far too dry.
Taken from the centre section of the pig, the loin can be used to provide individual chops, or boned to make steaks. Alternatively, it can be cooked conventionally as a joint. The belly is another ideal cut for slow-roasting, but these sections can also be used as a source of bacon; back bacon from the loin, and streaky from the belly.
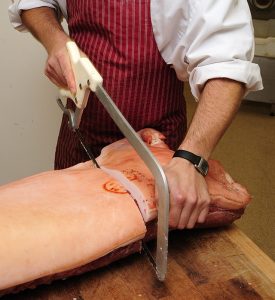
Cutting through the shoulder joint with a meat saw. It’s important these tools are only used on bone; they will tear meat. The soft tissue above and below the bone should always be tackled with a butcher’s steak knife.
 A Slice of Heaven
Bacon, of course, will require curing, possibly smoking and then slicing. This adds extra stages to the process and requires additional equipment. Curing can be done either wet (using a brine solution) or dry by simply rubbing on a curing salt mixture. When it comes to cutting, you’ll need a slicer to do a decent job. These cost several hundred pounds for a decent quality machine, although there are some second-hand bargains to be had on the internet. Alternatively, if you get on well with your butcher, then you might be able to persuade him to spend 20 minutes slicing it for you.
The same applies to the mincing of the meat you want to use for sausage-making. While it’s perfectly possible to do this using a domestic food processor with a chopping attachment, it can be a slow business. Not so bad if you’re only planning to make a few pounds of sausages, but if you’re faced with 20kg of meat to mince, then that’s a different story. Once again, your butcher may be persuaded to come to the rescue, or the friendly owner of your local farm shop might tackle the job for a nominal fee.
It was interesting chatting with Mike about the issues surrounding the butchering work; he’s an absolute mine of useful, practical information! As the conversation moved on to storage, he had some wise words of advice about freezing. This is the only option when dealing with the sort of meat quantities liberated by a couple of slaughtered pigs, but there are factors to bear in mind.
Pork has a high water content, which means that there’s a tendency for it to suffer if it remains frozen for long periods. While not catastrophic, Mike says there can be a noticeable deterioration in quality following a degree of structural breakdown caused by ice crystals. Consequently, for the very best results, it’s not recommended that you keep pork frozen for longer than six months, although Mike’s own policy is never to go longer than three.
 Can You Eat It?
Storage can become an issue for those rearing two or three pigs for the freezer. It’s one thing to have enough storage space for all the meat, but you should consider consumption rate too. It would be a bit of a shame to get four, five or six months down the line, and find yourself with bags and bags of frozen meat left to eat, which isn’t going to be quite as wonderful as it should be.
An average-sized, rare breed pig fresh out of the abattoir will typically weigh about 55kg (including the head, all the bones, but not the offal). If you bone-out the whole animal, then you’ll lose a about third of that weight, leaving around 36kg of usable meat. Double this to represent the quantity gained from two pigs, and most domestic rearers will find themselves with 72kg of prime pork to be consumed. This means that, in many cases, keepers need lots of friends to help eat it, or to be thinking about selling a proportion to speed the consumption rate.
Another consequence of jointing your pork at home is that you can generate appreciable quantities of waste (skin, bone, gristle, fat etc) and, nowadays, this needs to be dealt with responsibly. If you’re anxious to get as much from your pigs as possible, then the obvious option is to boil up these remains to produce tasty stock, after which the cooked leftovers can be disposed of with your domestic rubbish.
A good quality, 6in boning knife like this is essential for trimming duties. If meat has been hung at the abattoir, any darker areas of discolouration like this – together with excess fat plus any remaining gristle/sinew/oddments – should be removed. Incidentally, a knife’s quality will determine how well it sharpens, which is very important. A sharp knife is safer to use than a blunt one because it requires less pressure to cut, so is less inclined to slip.
Natural Wastage?
But not everyone has a need for lots of pork stock, in which case decisions must be made. The weight of surplus skin, bones and fat can soon mount up and it’s perfectly possible, if you’ve just jointed three pigs, to be left with 60kg of assorted, raw waste. This material mustn’t go for landfill now, and you can’t burn or bury it at home, either. You could have a word with your butcher but, if he’s reluctant to take it, the accepted method is to contact your local animal by-product collector. Whoever ends up taking it, though, there will almost certainly be a charge involved.
As Mike worked and chatted, the time simply flew. Once he’d demonstrated (among other things) the removal of the fillets, producing chops, preparing steaks, tying a boneless, rolled shoulder joint and the basics of sausage-making, our three hours were up. But his enthusiasm and expertise made the session so much more than just a dry, mechanical demonstration, which events like this can sometimes be. Getting involved is what it’s all about and, with Mike’s guidance, his hands-on courses at the Gingery Piggery represent an extremely wise investment for anyone contemplating a spot of home butchery.
 Always Take Care
Being organised is one of the keys to a good result. Ensure that you have plenty of space and a clean working environment, and have lots of food containers or large freezer bags standing by.
It’s important to appreciate that a fresh pork carcass typically carries a high infection risk, so the chances of catching something via an uncovered flesh wound are high. Don’t take chances. Existing cuts, or nicks from the knife, must be covered with a plaster. Wear gloves as an added precaution if you wish when working with raw meat.
You can also buy stab-protection gloves or gauntlets, which offer added protection against accidental cuts from the knife. Search for them on the internet although, as you’ll discover, good ones aren’t cheap to buy!
Finally – especially if you’ve been working on the kitchen table – take time to thoroughly disinfect and wash any areas where the raw meat has been.
To Bone Or Not?
A boned and rolled shoulder, beautifully tied and ready for the oven. The great fat marbling naturally occurring in this part of the animal makes this an exceptional joint for producing a succulent, tasty roast.
This is a commonly asked question. On the one hand, most people agree that leaving the bone in place adds to the overall flavour of a joint, which has to be a good thing.
On the flipside, though, a bone-in joint is likely to take longer to cook, and will certainly be more challenging to carve. Joints without a bone will generate less wastage, but they’ll have to be rolled and well tied (especially the shoulder) before cooking, which is another skill in itself.
Sub-standard tying will lead to the joint falling apart as it cooks; always a disappointment. It can also affect the cooking time, and might cause some parts to cook more quickly than others.
Is It Cooked?
Pinkness in cooked pork should be avoided at all costs. If you don’t want to ruin the joint by slicing into it to check the colour inside, then get yourself a temperature probe and use that.
Test the very centre of the joint (right next to the bone if there is one), and make sure that it’s up to 80°C.
Alternatively, for a more rough-and-ready guide, you can insert a knife deeply into the joint and then assess the colour of the juices that flow out. If there’s any sign of blood – even the slightest pinkish tinge – then the meat isn’t properly cooked.
What You’ll Need
Essentially you need five tools for an effective carcass-jointing session; a steak knife, a 6in boning knife, a sharpening steel, a meat saw and a cleaver (if you’re brave!).
The steak knife should have a wide blade to help ensure a smooth cut and, ideally, be about 8in long. Using a smaller, narrower knife will tend to leave ridges when cutting steak; not very attractive.
Quality is an important issue with meat knives. The golden rule is not to skimp when buying. What may seem like a bargain typically won’t be. The steel used for the blade is the all-important aspect.
An inferior quality blade will be thinner, more bendy and won’t sharpen nearly as well as a premium one. As a guide, expect to pay about £20 for a professional-quality steak knife, made by a manufacturer such as Victorinox (the Swiss Army knife people). Similar-looking knives are available for as little as £5, but really aren’t worth bothering with.
A 6in boning knife from the same manufacturer will also cost about £20. The most expensive tool is likely to be a meat/bone saw. A decent-sized one can cost as much as £50. Never be tempted to have a go with your old hacksaw or a wood saw; they won’t work as well, quite apart from the obvious hygiene issues.
Want To Learn More?
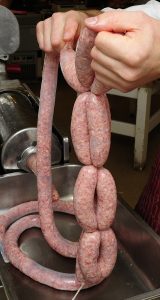
Mike is an expert sausage maker, and if you want to learn the enviable butcher’s trick of neatly twisting and tying freshly-made bangers into ‘knots’ of three, then he’s the man to see!
Mike Alexander offers a hands-on butcher masterclass and bespoke butchery tuition for groups and individuals at his farm shop in the New Forest, Hampshire. The three-hour masterclass covers everything you need to know for dealing with a pig carcass, and can include sausage-making, too. It costs £120 per person, for a minimum of two people.
To find out more, visit thefarmersbutcher.co.uk
To make a Butchery Masterclass booking, email Sarah at: sarah@thefarmersbutcher.co.uk or call and speak to Mike at the shop on: 01794 322686.
More content like this can be found in The Country Smallholder magazine. Subscribe here.
For FREE updates from the world of smallholding, sign up for The Country Smallholder newsletter here.