Alan Beat constructs a solid boundary fence
Our smallholding has one boundary that runs fairly straight and level for most of its length alongside a road, where it’s especially important to prevent livestock straying. I put up a fence of sorts along the roadside hedge when we first moved here 18 years ago, but time takes its toll and when I came to lay this hedge for the second time last winter, the wire was sagging and posts were starting to rot in the ground. I decided to dismantle the entire fence and replace it with a more substantial strained wire fence once the hedge had been laid. Here’s how I tackled the job.
PlanningI started by walking the boundary to assess the task and determine the precise line that the fence would take. The intention was partly to protect the laid hedge, so the fence needed to be at least four feet clear of this, otherwise cattle would reach over to graze the regrowth, as I have learned the hard way. A shallow drainage ditch ran along the field side of the hedge for much of its length, so the fence also needed to protect this, otherwise livestock (especially cattle) would damage and eventually fill in the ditch by trampling. I looked for soft ground and marshy patches that might prevent a solid fixing for straining posts, and I tried to avoid any change in direction at such areas, even if this meant diverting slightly from the obvious fence line. I also looked for significant dips or hollows in ground level that a slight diversion might avoid, or at least reduce to acceptable limits. I was thinking in straight lines all the time, bearing in mind that every change in direction requires another expensive straining post, so I tried to simplify the proposed fence line at the planning stage to the minimum number of straight runs that would do the job.Once the line was determined, a steady pace along it, at one yard per pace, gave the overall length and I could start working out the materials required.I also made a point of looking carefully at professionally erected fencing in my locality, to see how it was done.
Wire meshWoven mesh stock wire is effective for most situations. It has smaller size mesh at the bottom to prevent piglets or lambs from slipping through, and then larger mesh up to the top. It’s all too easy to overlook this fact when positioning the wire, so take care when you come to fix it. Stock wire comes in 50 metre rolls (about 55 yards) by 80cms wide (about 32 inches) to provide a fence of that height. Additional height, if required, is obtained by placing one or more strands of wire a few inches above this. Stock wire alone is adequate for young pigs, and for most sheep (but not wild or some primitive breeds which may jump over it). Cattle lean over the top and soon flatten fences unless a top strand of barbed wire is added. For goats and jumping sheep, top strands of plain wire are normally used to avoid risk of injury to their udders should they go “over the top”. Adult pigs may need a taut strand of barbed wire at ground level, or an electrified strand low down, to deter them from digging underneath.All fence wire is galvanised, but any break in this coating allows moisture in and the steel beneath will start to rust. With this in mind, it’s worth handling new rolls of wire with reasonable care, and making sure that any second-hand wire is still in good condition. For instance, if the galvanised coating has been bruised every few yards by careless stapling to, or removal from the previous posts, it won’t be suitable for a permanent boundary installation, though good enough perhaps for short-term protection fencing.Contractors often work with high tensile fence wire which is springy, strong, with very little stretch or give under load. Strained really tight between solid posts, this produces the piano-wire professional result, but be warned, it’s not easy to handle and work with. Indeed, high tensile wire is potentially very dangerous under tension, with the risk of whiplash, so in my view it’s best left to professionals. The commonly available mild steel fence wires are more easily and safely worked by amateurs, being softer and less springy with more give. The downside is that they take a permanent stretch when overloaded, so are more difficult to keep tight over time.My own requirement was to contain beef cattle and tame sheep, so I chose standard mild steel woven stock wire, topped by a single strand of barbed wire.
PostsWooden fence posts or stakes are available in a wide range of sizes and qualities. Heart of oak or chestnut will last up to 50 years in the ground without preservatives, but in my area these are not only expensive but difficult to find. Pressure treated softwood stakes are much cheaper and widely available, but they won’t last anywhere near as long, perhaps 15 years on average. It pays to be selective when buying posts. Choose straight ones that have been cut to a central point (not lopsided) and with a square top (not angled), otherwise the post will be difficult to drive in vertically. Posts should also be properly debarked before treatment so that the chemical penetrates effectively, and free from any major splits or faults in the grain which might open up and allow water to penetrate. My own preference is for round posts, as those sawn from larger timber have the grain exposed on the cut faces which is a potential weakness in the long term.For the main strainers, I chose pressure treated round posts with 5 or 6” diameter tops by 7’ long. For each straining post I bought two struts at 3 to 4” round by 8’ long. To support the mesh between strainers I chose posts with 3 to 4” diameter tops by 51/2’ long. Sorry it’s not metric, but that’s how they’re sold hereabouts.
Fixings For fixing the wire to these posts I used 40mm (11/2”) long galvanised staples. Galvanised 4” nails were handy for fastening struts into position against other posts.I also used some short lengths from a roll of high tensile single strand galvanised wire that I already had, as explained below.
MethodJust to be clear, I’ll refer to straining posts as strainers, and intermediate posts or stakes as posts from here on.I loaded the strainers, posts and struts into the transport box of the tractor and drove along the fence line to unload them at several convenient points. I made holes with the iron bar at the position of each strainer and partially drove a temporary second-hand stake into place, just firmly enough to serve as a marker. Then I ran a taut string between these temporary posts to mark the fence line. Offering up a strut to the marker enabled me to gauge the position for the adjacent post, against which one end of the strut would bear. Here I made another hole with the bar and partially drove the post, just firmly enough to stand vertically in position touching the string line. I worked along the line, placing more posts in the same way at about 8’ intervals until the next strainer was reached at the first change of direction. Here the adjacent posts were positioned using the struts as before, then work continued to the next strainer, and so on. The result was a long line of posts all ready to be driven home. I removed the string and temporary markers were removed, and a phone call brought the tractor-mounted post driver on site. The first strainer was driven home to finish at a height of 4’ above ground level. As work continued along the line, I checked that each post remained vertical and was driven to finish at 42” above ground. This was straightforward enough on level ground, but on the rising slope towards one end of the line, the position of tractor and post-driver had to be adjusted for each post to remain vertical. This became progressively more difficult as heavy rain made the field surface soft and slippery, but we persevered to drive a total of seven strainers and 34 posts in two hours.Next, the end strainers were firmly strutted to the base of the adjacent posts by offering up the strut, marking its position and cutting a shallow socket into both posts using the saw and chisel. The strut end face was marked and sawn to fit squarely in the socket. All cut surfaces were treated with wood preservative before the strut was tapped into place and secured with 4” nails through drilled holes. Next, I cut a length of high tensile wire and looped it from the base of the strainer to the top of the strutted post, crossing the strands over at the midpoint before joining, and taking care to leave two long free ends. The wire loop was held by means of a staple driven three-quarters home, permitting the wire to slide through it but not up or down. Slipping a short steel bar between the crossed over wires, I twisted the loop to shorten it until it was tightly tensioned between the post and strainer. Finally the twist was “locked in” using the free ends of wire that had been left for the purpose. A strainer cross-braced in this way is strongly resistant to the horizontal tension of the fence wire. The strainer resists pulling over because movement of its top is transferred through the strut to the base of the adjacent post, the top of which in turn is secured against movement by wire tensioned to the base of the strainer. The post and strainer form a system of mutual support that strives to remain upright, leaving their buried ends to directly oppose the horizontal force of the fence tension.Three of the strainers in my fence were positioned part-way along the boundary line at changes of direction. For these strainers, fence tension would tend to pull them into the field for an inward change of direction, or towards the hedge for an outward turn in the fence line. I supported these strainers in a different way. Those that would tend to pull into the field, I fitted with a tensioned wire from the top to a solid fixing in the hedge bank. (see right) Those that would tend to pull towards the hedge I strutted from the top to a solid fixing in the bank. (see bottom right) Fixing the wireNow was the time to unroll the stock wire. I placed the roll on its side next to an end strainer, unhooked the fastenings and anchored the loose end temporarily with the iron bar. The wire was rolled out along the fence line, and the far end looped temporarily over the strainer there. I lifted the wire up to the vertical (taking care to position the smaller mesh at the bottom!) and leaned it against the posts as I walked back towards the starting point. Here, I set about fixing the free end of the wire to the end strainer, wrapping it around the strainer before twisting the end wires around each horizontal strand. This arrangement results in a straight pull on the end strainer by the fence tension, whereas if the wire is fixed by staples, the tension applies a twisting force instead that can turn a strainer right out of soft ground. A few staples driven three quarters home prevented the wire from slipping up or down in the vertical plane but didn’t lock the wire horizontally.Now came the slightly tricky business of tensioning the wire to the strainer at the far end. Here the fence line was interrupted by a gateway, and I’d managed to position things so the tractor could be used for the purpose. A spare stake with the wire wrapped around it provided the means to apply an even tension across the mesh. Ropes tied to each end of this stake were fastened to the tow bar of the tractor. Very carefully, the tractor was inched forwards as the wire began to pull tight. This needs to be done very cautiously and with safety foremost in the mind. On no account attempt to over tension the wire – commonsense tells you the right amount.Once the wire was pulled reasonably tight along its length, I locked the tractor brake on and set about fixing the wire to the strainer. To hold the tension, I drove staples fully home over the joins in the mesh at two positions for each horizontal wire. Then I released the tractor brake and reversed slightly to slacken the free end before unfastening the ropes. Finally I cut off the surplus mesh and wrapped the remaining wires around the strainer to twist back onto themselves as before.Beyond the gateway, my second run of fencing couldn’t be tensioned using the tractor so I used two other methods instead, the first of which was the tourniquet principle. The roll of mesh was rolled out and fixed at one end by wrapping around the strainer as before. At the opposite end, I rigged up a similar arrangement of stake and ropes to apply an even pull, but this time I tied the other ends of the rope to a solid gatepost. I pulled the mesh as tight as I could by hand, fixed the ropes and then progressively drew the two ropes together using a second rope looped around them and twisted together as a tourniquet, with a lever to apply tension. (see above ) Again, this should be done cautiously for safety reasons – don’t try to over tension. Once the wire was reasonably tight, I stapled it firmly to the strainer before unwinding the ropes to release the tension.At this stage, the wire was drawn into a straight line between the two end strainers (see left) but it now needed to be pulled back several feet towards the hedge to meet a change of direction strainer, part-way along its length. Of course, this tightened the wire considerably and I had to make due allowance for this when applying the first stage, finding the right levels by trial and error before fixing the wire to the end strainer. Then I could lever the mesh back to meet the change of direction strainer, using the iron bar and a rope looped round a firm anchor point in the hedge. Each horizontal wire of the mesh was held to the strainer by two staples driven three quarters home before tension was released from the rope and bar. The resulting tension along the wire mesh was just right.I worked back along the fence line, fixing the horizontal wires to each post using staples driven three quarters home. The lowest strand was set 2” above ground level at each post.Next I ran out the required length of barbed wire, carrying the reel with a bar through the centre so that it unwound as I walked. I fastened one end by wrapping two or three turns round the end strainer before twisting the wire back onto itself, then temporarily fixed the opposite end in a straight line to the far strainer. A bit of trial and error soon established the length at which the wire would tighten when drawn back to meet the change of direction strainer. All that remained was to permanently fix the wire at the far end strainer, pull the wire back to the change of direction strainer using a rope anchored within the hedge, and to staple at all posts some 4” above the top strand of mesh, again not driving the staples fully home.
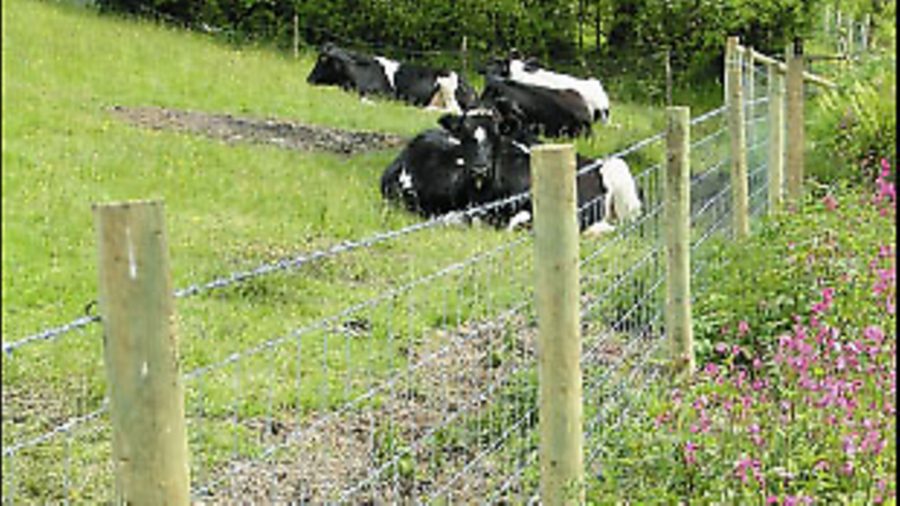
ResultThe result of all this was a taut stock wire fence of 38” overall height from ground level to top strand, carried on posts 42” high between strainers 4’ high. The wires had some free movement within their staples so that tension was even along the length, enabling flexing and recovery under load rather than stretching and sagging. The fence presented a substantial barrier that should safely contain our livestock for the next 15 years, perhaps more (see pics: cattle and fence 1,2 & 3).Seen alongside the laid hedge, it represented the public face of our smallholding and I wanted it to look the part. After all, as John Seymour once said, if we don’t care what our countryside looks like, who will? n
This article is from Country Smallholding magazine’s January 2006 issue.To order Back Issues of the magazine click on the link to the left