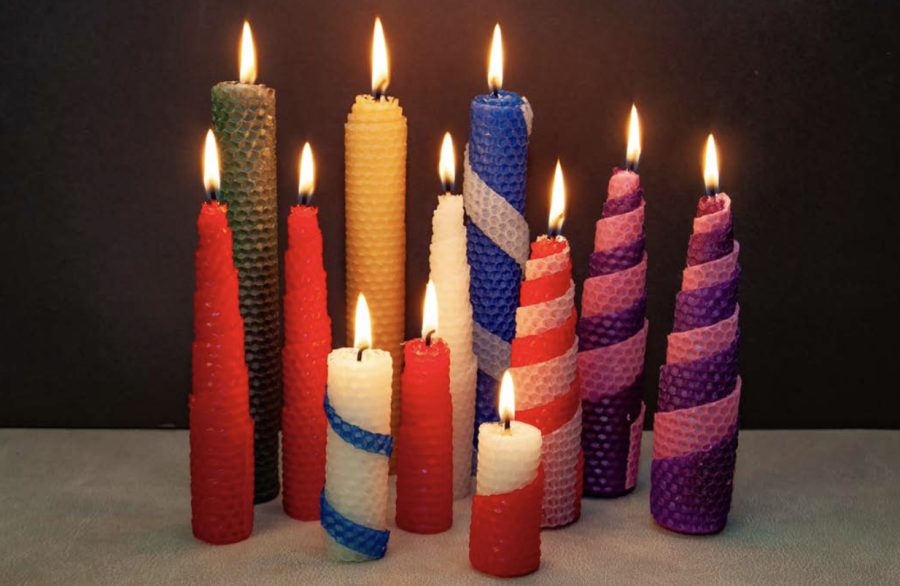
Claire Waring describes how to make your own beeswax candles for Christmas.
What nicer way to celebrate your bees at Christmas than to make some candles from their beeswax? Just imagine them burning as the centrepiece of your festivities, knowing that this is special beeswax which has been made by your bees that you have cared for during the year.
However, maybe you have only just started beekeeping or you just have a couple of hives so the beeswax harvest isn’t very large. Don’t despair. You can still celebrate by using some beeswax purchased from bee equipment suppliers. While you can buy blocks of plain beeswax from which to make moulded candles, the easier way is probably to roll them.
MAKING ROLLED CANDLES
Start with a sheet of beeswax foundation, exactly the same as you would put into a brood or super frame – but without the wire! Equipment suppliers sell this and, indeed, offer foundation which has been dyed specifically for candles. Over the years, the range of colours has expanded from a rather dull blue, green and red to colours such as purple, bright yellow, pink and even black!
The fun part of rolling candles is the variation in designs you can achieve. You can use the full sheet or just part, trim the top to give a slight point to the finished article or cut it across the diagonal (and get two from one sheet!). You can also get different heights by rolling the sheet parallel to the long or short side. Further variations involve using two colours and rolling them up together. The possibilities are as wide as your imagination and ingenuity.
THE PRINCIPLE IS THE SAME FOR ALL SHAPES AND SIZES
You place the wick along one side and then roll up the sheet. Easy!
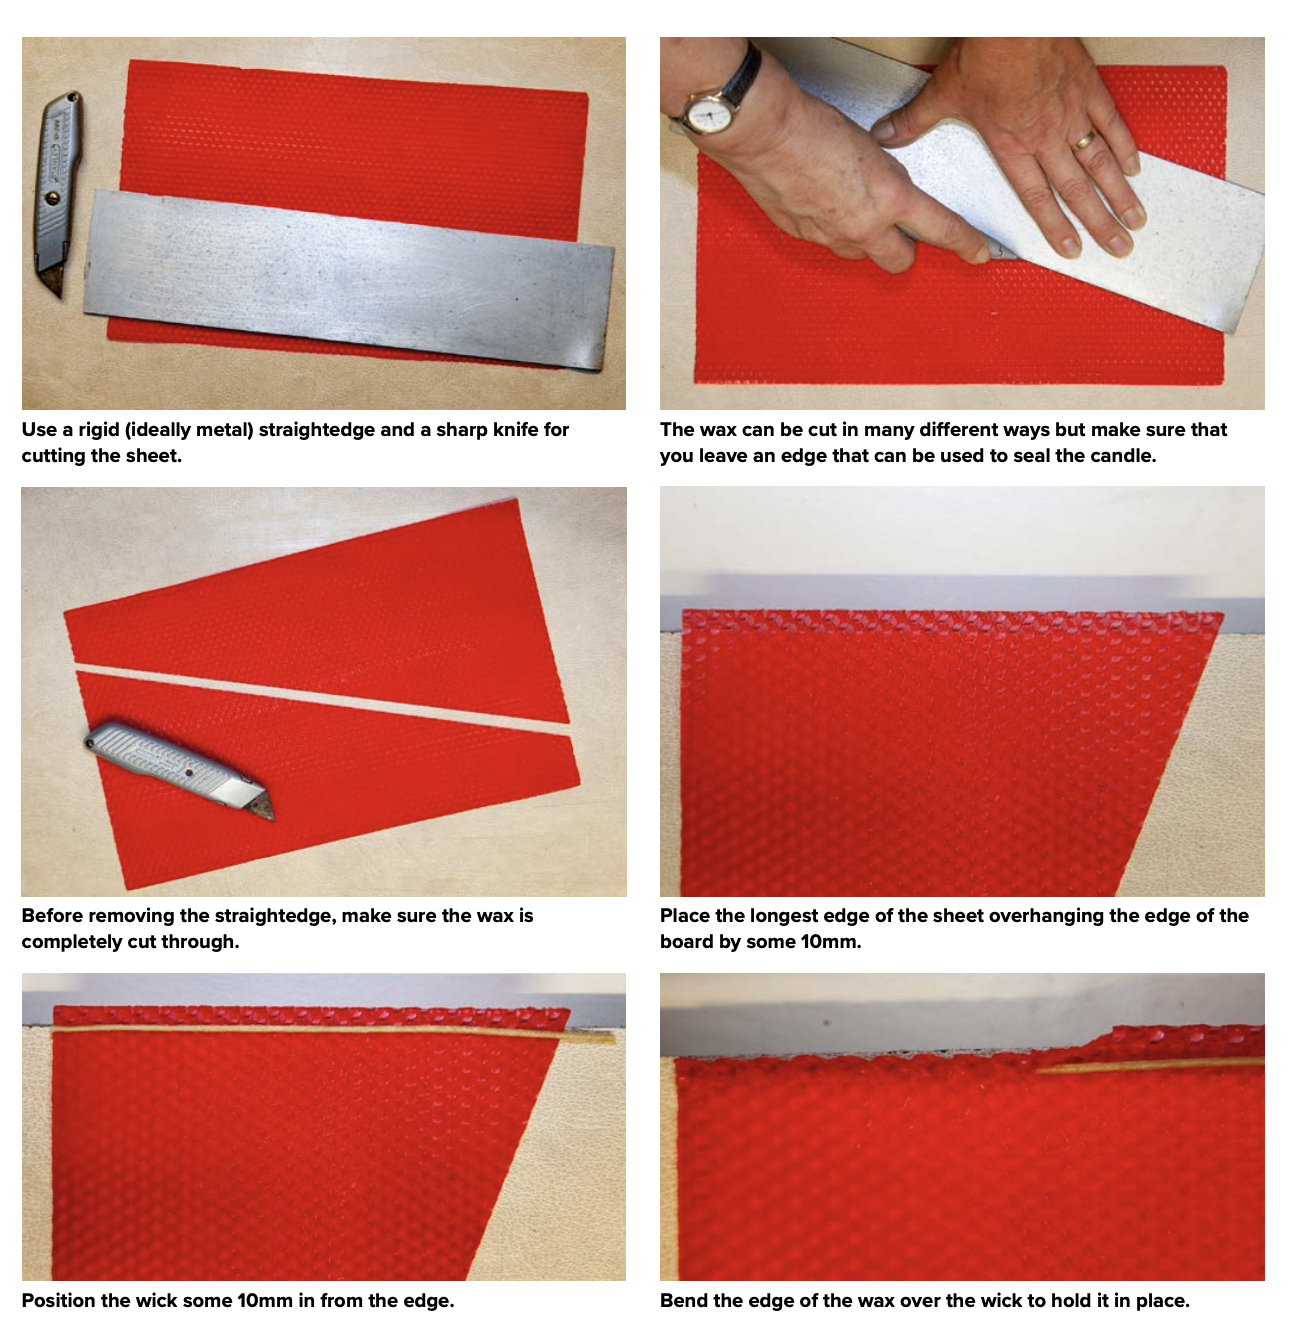
First decide how you are going to cut your wax sheet. Get a cutting board (I use a scrap piece of work surface) and a sharp knife such as a Stanley knife. You also need a rigid straight edge; a metal rule works well. With a plastic ruler, you are likely to slice thin bits off it, when you cut across the wax.
Lay your wax sheet on the board. Position the straight edge as required and cut through the sheet along its length.
Before you move the straight edge, check you have cut the wax into two parts. If you have to cut through bits freehand, it could be wavy.
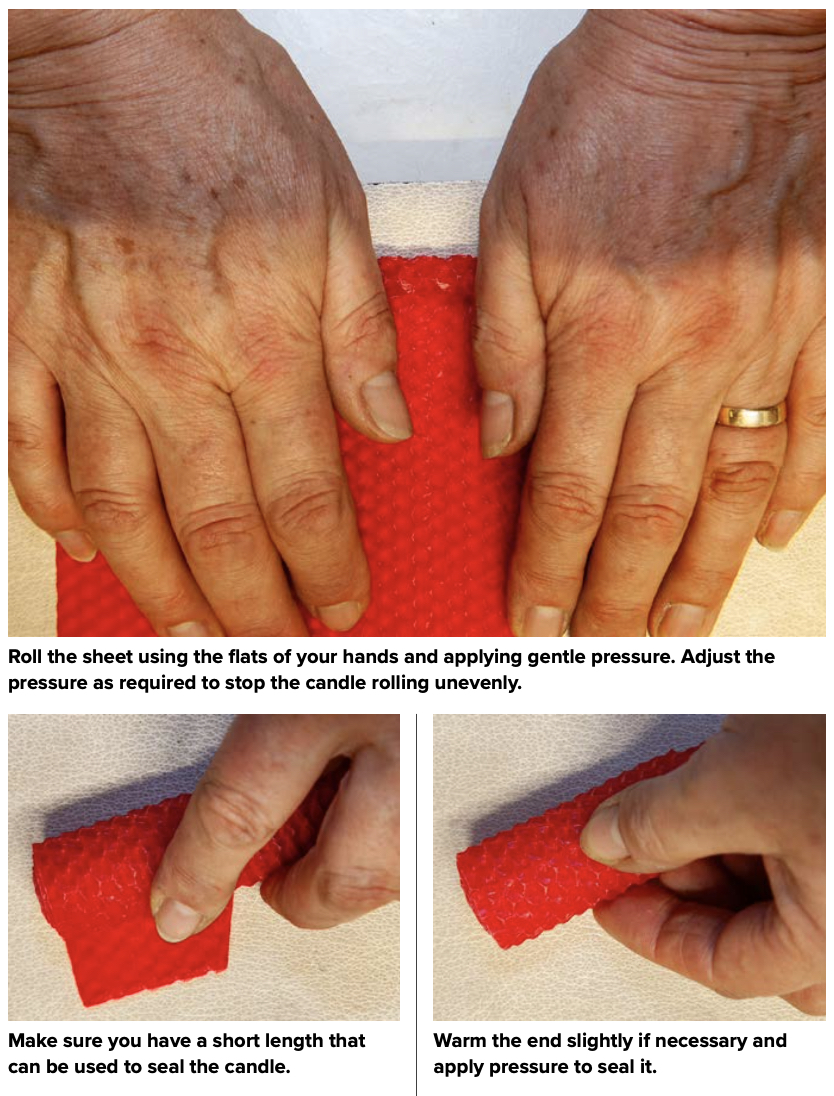
When cutting across the diagonal, start and end the cut 2–3 cm up at each end. This gives you a length of wax to seal the end of the candle to stop it unrolling.
CHOOSING THE WICK
Wick comes in different thicknesses and you need the right one that melts the wax at the same rate as it burns. If the wick is too thin, the candle will go out. If it is too thick, the flame will ‘drown’ in the molten wax and the candle will smoke.
Candlewick is plaited from many fine fibres so that it burns evenly. It comes in different thicknesses for different diameter candles. For a one-inch beeswax candle, purchase one-inch wick from a beekeeping supplier and you will be sure that it is correct. It will be too thick for a one-inch paraffin wax candle.
Don’t try to skimp. Buy some proper wick. It really isn’t expensive and is worth every penny to get a quality end-product.
For a sheet of British Standard brood foundation, which is the commonest size readily available in the range of colours, I find that a one-inch or three-quarter-inch wick works pretty well.
CUTTING THE WICK TO THE RIGHT SIZE.
Take your beeswax sheet and measure the wick against the final height, cutting it 5–10 mm longer so you have some protruding to light the candle. You can dip the wick in wax at this stage if you wish. If I am doing a batch of candles, I cut sufficient lengths of wick and then dip them briefly in a container of molten wax. When you withdraw the wick, the wax solidifies quickly and you can run your fingers down it to straighten it before it sets completely.
YOU MAY NEED TO WARM THE WAX
To roll your candle easily, the wax needs to be pliable. If it isn’t, warm it gently with something like a hair dryer on the lowest heat. Don’t warm it too much or it will squash when you roll it.
ROLL AWAY
Place the wax sheet on the board with about 10 mm protruding over the edge. Place the wick along the wax about 10 mm in from the edge. This just makes it easier to bend it over.
Bend the edge of the wax over the wick and press gently to hold the wick in position.
Using the flats of your hands, roll up the sheet. Try to keep the bottom edge even, although this can be rectified later. If you find the roll going skew, apply more pressure with one hand than the other, as appropriate, to straighten it.
Keep rolling to the end of the sheet. Then seal the end. Press along the edge (warm it gently if necessary) or roll the candle backwards and forwards on the board with the end underneath.
If the candle isn’t round, roll it back and forth on the board, applying pressure as necessary to even it out.
Finally, flatten the bottom. Often this can be done simply by holding the candle upright and pressing it down on the board. If this doesn’t work, warm the bottom gently before trying again.
DRESS IT UP TO BE A GIFT
Your candle can be dressed up if you want to give it as a present. You can tie ribbon round or use a shiny paper collar. We use a printed label to hold the collar together which also tells the recipient that it was made it for them.
With health and safety being what it is, don’t forget to remind them to remove any decorations before lighting and not to leave a lighted candle unattended.
Your rolled beeswax candle will burn quicker than a moulded one but it should still give you pleasure for several hours.
ABOUT CLAIRE WARING
Claire has kept bees in Northamptonshire since 1980. She quickly became involved with local and national beekeeping associations, serving as the first female General Secretary of the British Beekeepers’ Association in 2004–2005.
She was Editor of Bee Craft for 23 years until the magazine’s centenary in 2019, seeing it achieve gold, silver and bronze medals at Apimondia international beekeeping congresses.
Together with her late husband, Adrian, she wrote the Haynes Bee Manual, which includes some 400 of their photographs, and Teach Yourself Beekeeping, with a second edition published as Starting Out in Beekeeping. She also made a major contribution to Collins Beekeeper’s Bible. She has contributed articles to a number of smallholder magazines.
Claire is a very keen photographer, specialising in wildlife and macro photography, particularly bees and other small creatures. She won the gold medal for beekeeping photography at Apimondia in 2005 and the silver medal in 2009.
This article originally appeared in the November 2023 issue of The Country Smallholder magazine. To receive regular copies of The Country Smallholder magazine featuring more articles like this, subscribe here.
For FREE updates from the world of smallholding, sign up for The Country Smallholder newsletter here.

